How Give A Kid an evil Look
Sunday, 27 May 2012
0
comments
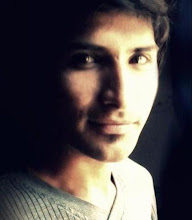
A. Open the photo
Two. Duplicate the original layer and call it "Eyes" (well, this is purely for convenience :)
Three. Change the blend mode (blend mode) of the new layer to Screen


4. Add a new layer mask (layer mask) and fill it with black.
5. Now select the white color (can also be any shades of gray, if you want to achieve transparency) and start to paint eyes as long as they do not brighten. Use different size brushes to achieve the desired effect. You can also change the opacity of the brush layer, or to make your eyes lighter or darker contrast.

6. Press CTRL + SHIFT + ALT + E to merge them into a new layer.

7. Add a Channel Mixer, to put the photo in BW. For each individual picture settings can be different, so do not need to copy the values from my version :)

8. Select the channel mixer and set the blending mode to multiply.


9. Now select our merged layer and apply Image -> Adjustments -> Shadow / Highlight in order to align the shadows and highlights.

10. Again, press CTRL + SHIFT + ALT + E to merge layers.
11. Next, I chose Cloner Stamp on the toolbar, and painted the extra glare on his face guy. For your photos, this might not be needed, so skip this step.

12. Select the Dodge Tool, set the Range - Highlights and Exposure - 50%. Start draw in detail iris eye to make eyes more expressive. The main thing is not to overdo it, because it can get a full sheet)

13. Снова объединяем все слои (CTRL+SHIFT+ALT+E)
14. На новый слой применяем Filter -> Other -> Hig Pass. Я выставил значение примерно 80%, но для фотографий с разным разрешением, значения могут быть разные. Так что опять же подбираем на глаз.

15. Change the Blend Mode of the new layer to Soft Light. Picture is sharper, with deep shadows.
16. Finally, merge the layers (CTRL + SHIFT + ALT + E) and a little shar pei picture. You can do this in any way, what you like: Sharpen, Unsharp Mask, Smart Mask, etc. I personally like to make a duplicate layer, set the mode to Soft Light and apply the High Pass filter with a minimum value.
In general, it is all :)
Categories:
Graphic and Designing,
Photoshop