Using Photoshop to Colour a Black & White Photo From Scratch
Monday, 11 June 2012
0
comments
 Using Photoshop to Colour a Black & White Photo From Scratch
 In this tutorial, we’re going to be using Adobe Photoshop to transfrom a black and white photo into a full-colour masterpiece. It’s an unusual technique, but offers a good guide for teaching you about how to use layer masks more effectively in your post-processing work.
Tutorial Details
Program: PhotoshopCompletion Time: 2-3 hours
Difficulty: Easy
Before We Start
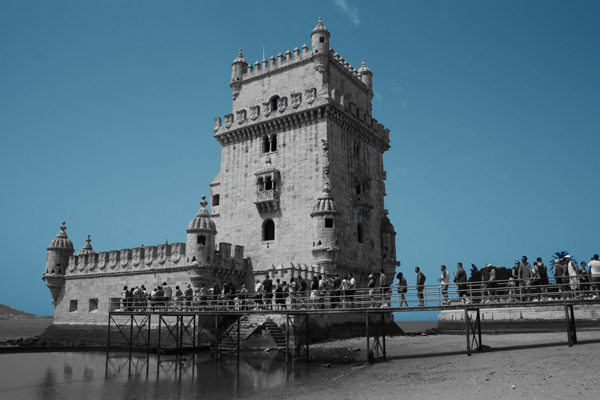
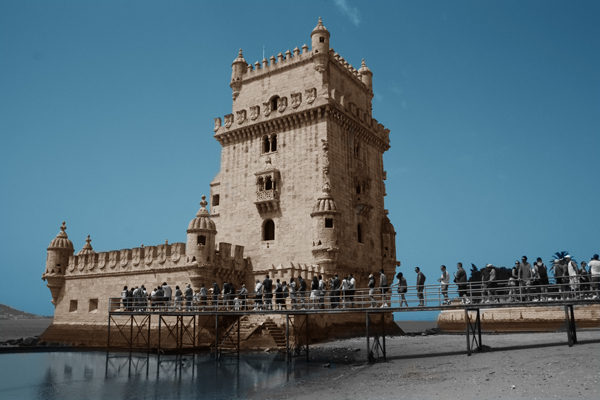
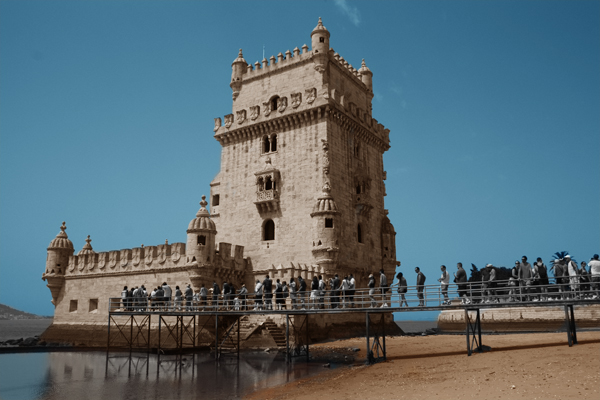
For this tutorial, I have used Adobe Photoshop and a Wacom tablet. The tablet sped this whole process up for me, and if you have one I would recommend using it. If you happen to only have a mouse, then don’t worry but be aware it might just take you a little longer to get some of the details perfect.The photo I shot a while ago while I was on my travels, but my colour version was slighly blurry so I decided to color this version.
Feel free to download it and follow along with me or alternatively you can use your own image but tweak the settings.
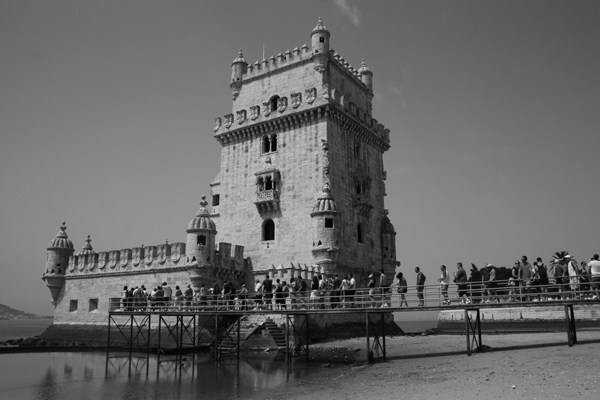
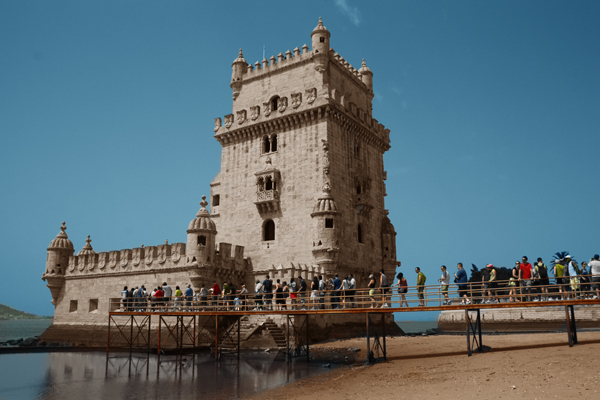
Can you name this building? Bonus points if you know!
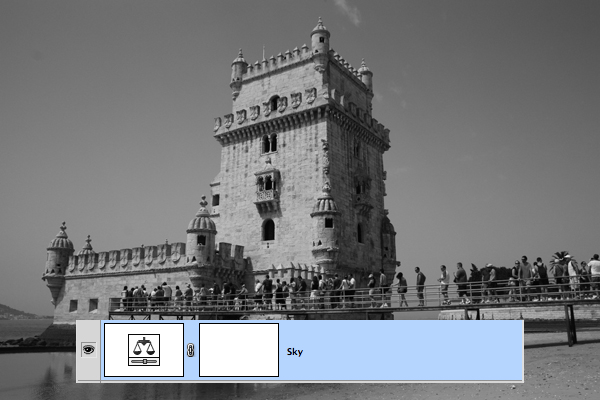
Step 1. The Beginning
We need to work out what part of the image contains the largest amount of space. In this case it happens to be the sky.To begin select Layer > New Adjustment Layer > Colour Balance.
Rename the layer "sky". This will make things easier later on.
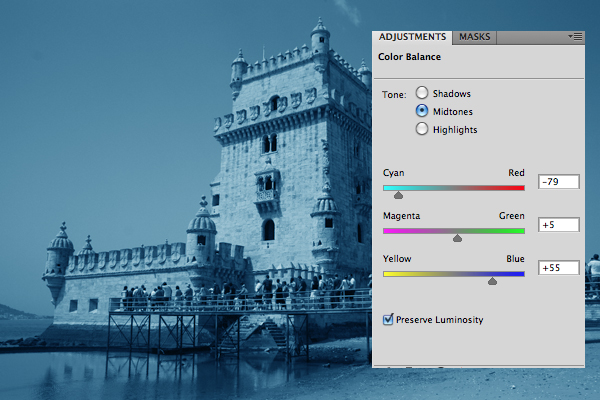
Step 2. Change the Midtones
Then simply change the midtones colours to:- -79
- +5
- +55
Step 3. Layer Masks
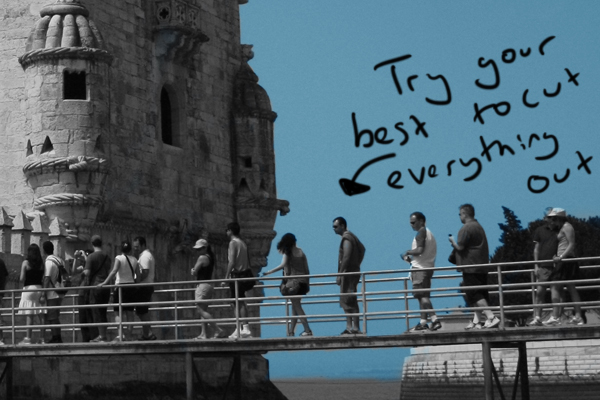
Select a soft brush from the brushes panel. Simply then select the layer mask on the color balance layer. This is the blank white box.Then select the colour black and then paint over the area you don’t want to show up. In this case it is everything apart from the sky.
If you make a mistake then don’t worry, repaint the area with a white brush and the colour will come through again.
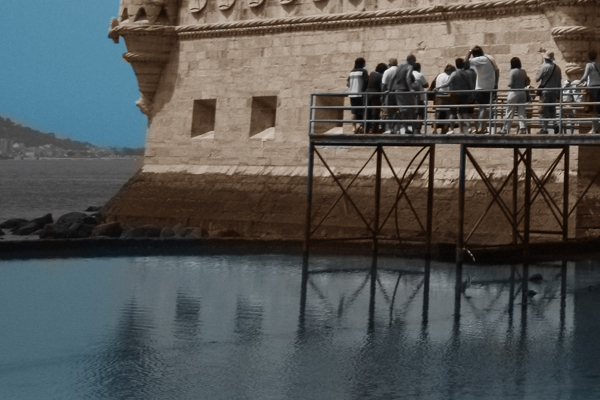
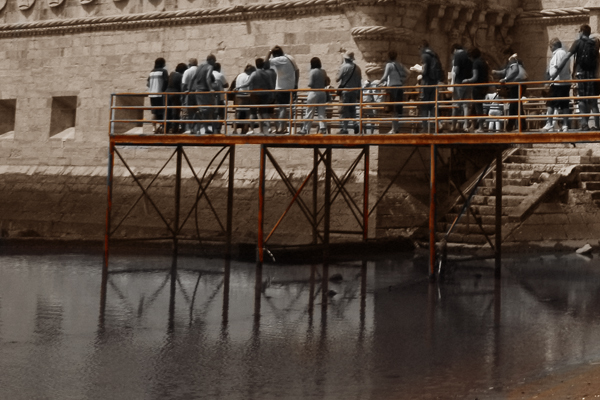
Try your best to cut everything out as well as you can. In this example their are some parts containing people as well as railings. Although tricky it is important to cut around everything perfectly.
Step 4. Inverting Layer Masks
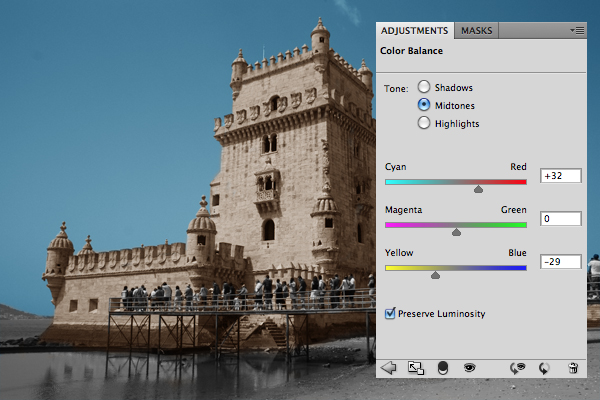
The next stage is quite easy. We are going to colour the second biggest object, the tower.Duplicate the colour balance from before. (CMD/CTRL + J). Change the midtones settings to the colours below.
- +32
- 0
- -29
Using a brush with the colour black selected, paint around the areas you wish to delete. Alternatively you could also use the eraser tool.

Step 5. Coloring the Water
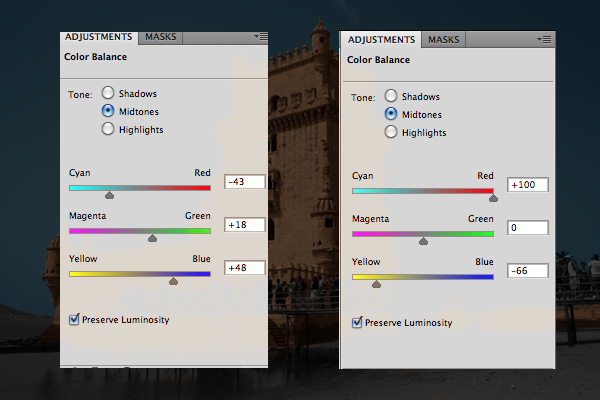
Let make things a little harder for ourselves. This time we are going to colour the water reflecting the tower. This means we will have to use two colours – both blue and a yellow/orange – and therefore need two colour balance layers.So select Layer > New Adjustment Layer > Colour Balance, and then duplicate it. I would also advise naming them before we start using them.
For the blue colour balance change the following settings (midtones only):
- -43
- +18
- +48
- +100
- 0
- -66
Step 6. Study the Image
Use the fill tool with the colour black selected to fill both the layer masks. This will make them empty and nothing will be on screen.Using the brush tool with the colour white selected we are going to slowly start to paint the reflection.
Below we start to study the reflection in the water. On the left hand side it is obvious that this area is not reflecting the tower at all, therefore this area will be the bluest.

Step 7. Using Different Opacities
First of all paint this small area on the left using the blue colour balance layer.At the top of the brush settings there will be an opacity scale. Reduce this to around 20-30% and then paint the rest of the water.
You will be able to see the difference between the two clearly.
Step 8. Paint the Tower’s Reflection
Using the yellow/orange colour balance layer, paint over the top the area which will show the tower reflected. Play around with the opacity strength until you have a result that you’re happy with.
Step 9. Add in the Sand
Complete the sand using the same techniques we have already learnt. Here is a quick reminder if you are stuck. Create a colour balance layer, fill the layer mask black, and then paint white onto it make it the colour appear. Use different opacity brushes for different strengths of colour.My colour settings (midtones only):
- +52
- 0
- -49
Step 10. Color the Rail
It’s time to colour that rail! I personally chose to give it a rusty orange/brown colour. Using 10% opacity, I also coloured the water to add a slight colour to the legs in the water.
Step 11. Finish the Easy Parts
I will leave you to finish off the other easy parts of the image. In this case, I coloured the sea (dark gray) and then the land in the distance (with a hazy green).
Step 12. Painting the Peoples Skin
So you don’t have to use a colour balance layer for every single person, we will try to approach this in a simple way. We will use just two color balance layers for skin colour, and we can then use different opacities for varying skin tones.For a light skinned person use the settings:
Midtones:
- 0
- 0
- -19
- +28
- -42
- -80
Shadows:
- +18
- +79
- +59
- +100
- 0
- -18
- +28
- +11
- +11
Step 13. Start Coloring the Clothing
We’re nearly there! Next, start to colour the clothing of the people in the image. Remember you can use two colours to make one, if you overlay colours at 50% opacity. This can hopefully cut down on the number of layers you’ll need to use.Here is a summary of basic colour mixing:
Red + Yellow = Orange
Blue + Yellow = Green
Red + Blue = Purple
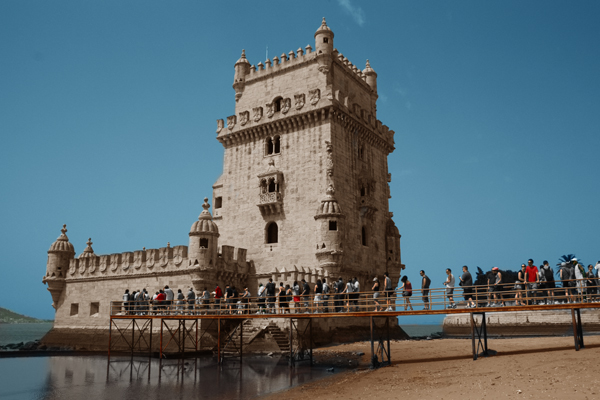
To finish up, colour the rest of people and any other objects you might have missed. Hopefully you’ll be left with something very similar to an original colour photo!
Congratulations!
I hope you have enjoyed using this method and learnt a lot about layer masking techniques for your own post-processing. Any time you’d like to adjust the colour for a specific part of your image, this Photoshop technique is one of the best ways to go about it. To finish up, lets summarize what we have learnt:- Using colour balance and layer masks together in order to colour objects.
- Use the colour white to add to the image, use the colour black to remove from the image.
- Start by selecting the largest area of one colour.
- Inverting a layer mask in order to colour the second largest area.
- Using different opacities in order to build up the correct colour details.
Categories:
Photoshop